Monday, November 9, 2015

Bow #3: mortise repair

Bow #3 is not, by appearances, anything special. It has a nice frog with maybe silver fittings on it and a lot of abalone. There's no maker's mark or anything. I am going to repair the hole and cracks that are in the frog mortise.
11986e3330d070f29f892679682dabc1.jpg


It's a hole/crack combination that had previously been patched with a misshapen crumb of wood and now daylight was showing through into the mortise of the stick. The cracks were still short but compounding in diverse directions. The mortise was unnecessarily deep so this area is very thin.

I cleared my procedure on maestronet and got their stamp of approval. Ya'll, a few of the folks on the Pegbox can be intimidating, but most of them are so helpful and kind when you ask even a silly beginner question. There are a lot of respected professionals there who are willing to be so generous with their knowledge. Not to mention, just perusing the old threads is an education!


Working from the mortise, I dab in wood glue/sawdust into the hole/crack as filler, then insert a few slivers of CA-glue-covered wood into the mortise, squishing the filler out through the cracks, to be the new mortise floor. Then I re-carve out the cavity to the depth required by the frog.

For patch wood I'm using shards from another bow.

Displaying WP_20151109_08_52_58_Pro.jpg

After the first stuff dried, extra filler had to be applied, since wood glue shrinks as it dries. I crumbled up the crumb of wood which was matching dark tropical wood, probably original, to make a filler that matches.

Displaying WP_20151109_08_59_13_Pro.jpg

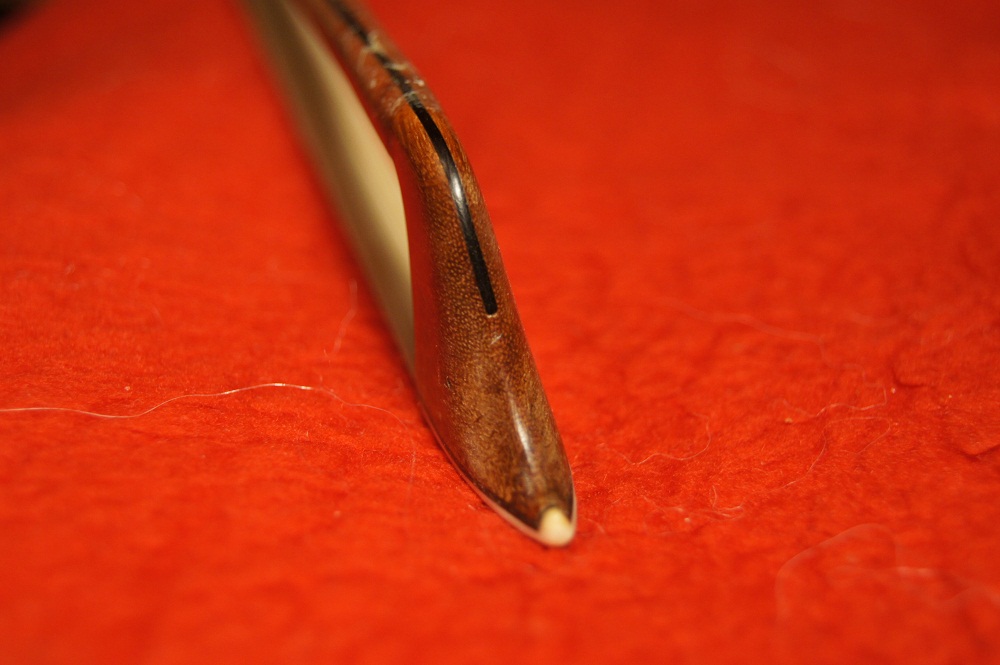
No original wood was removed and it now has structural integrity. I polished the whole thing with linseed oil and pumice. Apparently the powder sticks in the holes and such and makes it shinier. It looks gorgeous now.

Displaying WP_20151109_15_17_48_Pro.jpg

I think this was originally a rather nice bow. The fittings aren't silver, but the abalone in the frog is just lovely. It's even in the end of the screw. Can't wait to hair it and try it out!

Faux snakewood bow head graft

I don't know if I can call this a tutorial, since it's more what NOT to do! But the ending is happy.

One of the bows in my 3-bows-for-$20 lot was painted in an extremely obvious faux snakewood pattern and missing the head. The head was visible in the Ebay pictures but not even in the shipping box...explain that one...needless to say I was not thrilled. The frog was also destroyed. There just wasn't much left of it, and if it was painted with this tacky fake pattern, it probably wasn't much to begin with.

However, just for fun, I did the bathtub float test to see how dense the wood was. This bow sank like a rock. Only really dense tropical wood does that -- the good stuff. Maybe it's ironwood. I don't know. At any rate, my curiosity was piqued and I decided to graft the head of my old cheap bow onto it and let it have the plastic frog from it too. It would be a nice repair challenge. I had this design in mind, except of course an un-matching head.


https://www.google.com/url?sa=i&rct=j&q=&esrc=s&source=images&cd=&cad=rja&uact=8&ved=0CAcQjRxqFQoTCP_HpMidhMkCFcFCJgod7lMEdA&url=http%3A%2F%2Fwww.maestronet.com%2Fforum%2Findex.php%3F%2Ftopic%2F325936-violn-bow-removing-the-ivoryebony-tip-from-the-head%2F&bvm=bv.106923889,d.eWE&psig=AFQjCNHayqQOGu_rH7wtLgE3h90o0L9xHA&ust=1447189073777371

I spent maybe an hour and a half carving out the head graft. It had a spline about two inches long and an eighth inch thick or less. Very involved work. Here I have the shape roughed out:
Displaying WP_20151107_21_06_10_Pro.jpg

Halfway through -- I alternated between sawing through that tough, hard, dark tropical wood and carving my much softer head graft.

Displaying WP_20151107_21_56_15_Pro.jpg

It was time for dry-fitting. It was a nice tight fit. Then -- heartbreak. I tugged to pull the graft out of dry-fit to apply glue, and the head snapped off. Oh, why oh why. I went to bed.
Displaying WP_20151107_22_40_10_Pro.jpg

I glued the spline in to repair the stick. I had already carved a 2-inch-long slit into my nice bow wood. It was unnecessary -- I could have just done the standard repair for grafting on the original head.
Displaying WP_20151109_09_02_11_Pro.jpg

Then I used some walnut veneer to spline on the head.

Displaying WP_20151109_13_49_25_Pro.jpg

It worked. It seems to be working, anyway.

Displaying WP_20151109_14_27_46_Pro.jpg

Subjectively speaking, the sound from this bow is beautiful. It makes my instrument sound so much warmer. The pull is so smooth. Oh I love it! No one else will ever want this old thing anyway. To me it's a keeper!

(It can't even be blamed on new bow hair -- I temporarily used my old bow hair since I need to play tomorrow, and the new stuff won't get here till Saturday. It's thin and oh so brittle.)

However, a recorded playing test is still needed. I have two more bows to hair when the horsehair arrives in the mail!

Friday, November 6, 2015

New Old Bows unboxing

They arrived! I was so excited to see what I had bought.

My heart sank as I withdrew them from the cobbled-together triangular mailing box.

The one with the silver fittings -- turned out to be completely metal! What the heck?
Displaying WP_20151106_20_37_35_Pro.jpg
The faux snakewood one had the head completely broken off. Not only off, but missing. Not even in the box.

The last one, the nondescript one, had cracks and daylight showing in the frog chamber of the stick.

Oh my.

I wrote a sternly worded note to the seller requesting my money back. Then I googled just what is an all-metal bow. Who has ever heard of such a thing?

Displaying WP_20151106_20_42_47_Pro.jpg
Turns out, it's not such a bad thing. They were big money in the late 1800s and preferred by the top violinists to the top artisan pernambuco ones that sell for big money nowadays. But mine isn't one of those. It's a Heddon bow.
 
 http://www.google.com/patents/US2252929

James Heddon went on to have a great fishing rod company, but in 1941 he patented a steel-aluminum violin bow with a distinctive screw. It was instantly recognizable. They dented and bent easily so are quite rare. It's worth about $50 -- maybe not anything out of Antiques Roadshow, but it's kind of cool! And apparently more than serviceable for music-making. I cancelled my request for money back.

When the bow hair comes in the mail, I'll get to see for myself if it's a keeper.

Now to puzzle out what to do with the other two...

String Review: D'Addario Prelude

At first, I was going to write a scathing review of the D'Addario Prelude strings, since I detest them.
I got them in the cheapest light tension or gauge. The E string downright hurt my ears, it was so shrill, sending me to the Goldbrokat E which is much sweeter but still leaves much to be desired. They are available on Amazon for $17 but I think I paid more like $12 on Ebay.

Product Details
http://www.amazon.com/DAddario-Prelude-Violin-String-Tension/dp/B003BNHJHU/ref=sr_1_3?ie=UTF8&qid=1446820654&sr=8-3&keywords=prelude+d%27addario+violin+light+4%2F4

However, I have now read other, more knowledgeable people's opinions on these strings here: http://www.violinstringreview.com/prelude.html

Now I am considering that perhaps these are OK for student strings -- after all, they are durable, having lasted me a summer and fall already without breaking. They stay in tune pretty well, even when constantly traveling to and fro venues. They do project, to the point where playing with other acoustic instruments and singers requires putting the other guys on a mic while the violin stays acoustic in a large cathedral-like church.

So, perhaps these are OK student strings. The problem is probably metal-core, student-grade strings in general. Why would you save only a few dollars but sound terrible? It's really discouraging to a student when her instrument makes her own skin crawl.

A few more dollars will get you Pro Arte strings, with synthetic core. (Check Ebay -- I see them for $23 including shipping.) I like a warm sound, so much that I have looked into gut strings. The Pro Arte strings are supposed to be very warm and dark. They are not powerful; to me this is a plus! Downsides include a reputation for wearing out after a few months, and an E-string that is nothing to write home about. Some people include the lack of projection as a downside too, but to me that is a plus.

Thursday, November 5, 2015

Oil Varnish

In the last post, I stripped and stained my pre-1914 Suzuki Nippon violin. Don't worry, everyone, someone else sanded off the original finish first, not me. But that does remind me to write a disclaimer -- ya'll, don't refinish a violin. Not for looks, not for fun, not because it's missing in one spot -- the sound is in that old varnish. It also ruins the value and every violin expert you meet will say, "Hmph, SOMEONE refinished that violin. Such a shame. Ruined it."

That being said, let's proceed...

I did an ultra-thin coat of oil varnish as a ground. I was tired of water-soluble things. This is after two coats.


In between coats (all coats are thinned with turpentine), I polished with the pumice. The less-shiny half is the polished half.


The first coat I did was too diluted so I put on another coat that was too thick. This too-thick coat developed bubbles and trapped dust. Yuck.

The stuff I have comes out of the bottle exactly like honey. Turns out, you are supposed to dilute it a little (not a lot, which is what I did the first time) with turpentine to make what is called wiping varnish. This makes the bubbles release easier and dries faster so less dust gets in and runs don't have a chance to develop. Not to mention, it goes on much more smoothly.


So, to sum up, for oil varnish, do lots of fairly thin coats and polish, polish, polish between. Build it up slowly. Give it time to dry between. Be patient, and it will look beautiful.

Next post: Fitting a bridge.

Wednesday, November 4, 2015

Strip and stain

My first project violin: Suzuki Nippon junker.

The label means that it is made in a factory in Japan around the turn of the 20th century. "Made in Nippon" changed to "Japan" in 1914 so that's how I know. I bought it on Ebay for about $80 several years ago, with the goal of picking up violin again. I played for a year or so when I was a kid.

When the violin arrived I knew it would be in rough shape. Someone had sanded off part of the finish, the soundpost was rattling around inside, there was a big glued crack, and the neck was caving in. I went ahead and straightened the neck using wood glue (this was before I did a lot of research). I strung it up with its three remaining strings. The sounds issuing forth were so horrible I put it in the closet for two years.


This spring, I decided to fix it up.


I stripped it with Citristrip. The painted-on purfling came right off too. It's not even a good quality factory violin. Oh well, at least now it's honest!


I stained it with coffee (espresso boiled down to make it even thicker.) It was a nice color, but sticky.


I appled an egg white protein ground. Egg whites get beaten till stiff, then the liquid strained off is the protein. This lovely (NOT) stuff melted into the water-soluble coffee stickiness.


All this liquid raised the grain of the wood, which was my intention, except it did not raise the lengthwise "corduroy" grain, it raised the rough exposed fibers from sanding. You shouldn't really sand a violin, you're supposed to scrape it. I tried to remind myself that that was the last owner's fault, not mine, but I still hated it.


I rubbed off the extra stickiness and the color came right off. Everything came off except a last bit of sticky in which the cloth fibers embedded themselves. I got pretty frustrated at this point.


 I went out and ordered pumice stone, which is the abrasive you're supposed to use. It gave me a nice clean slate. The wood is a little darker than before all this effort, but not much.


Then I got a little crazy. I used food coloring for stain. Wilton gel food coloring, to be specific -- it is crazy concentrated. Here is the first coat, which is too red for my liking. Disclaimer: this is probably a bad idea. It will likely fade with time. It faded significantly in the first week or so.


Then I added extra color -- enough to take off in the antiquing process, so to speak.


A wet rag rubbed in the shoulder areas of the violin added just the contrast I was looking for.


Next post: oil varnish!

Carving the bridge

My first bridge

You can buy "fitted" bridges. But don't. The feet won't connect fully with your violin, so you will lose a lot of sound. And it will be clunky and thick, further deadening your sound. Buy a bridge blank, instead, and some exacto knives.

A bridge blank comes too tall and you have to taper and shape the feet to fit the curve of your violin, and lower and shape and taper the top edge to fit your strings. I still think my neck/fingerboard is at too low of an angle so I severely carved the bridge shorter (along the pen line) hoping to lower the strings too so I could actually play them, but I am not sure even this is enough. A high bridge sounds more powerful so I don't want to chop off too much.


 You can find lots of beautiful historical bridges to be inspired by, or even copy, at http://www.violinbridges.co.uk/. They even have templates.

Morris & Smith Violin 93

There are also measurements available for optimal sound. Get some calipers and do measure -- don't eyeball it, when the experts have already figured out what sounds good. The calipers will come in very handy and they are less than $20 at Harbor Freight or something.

My understanding is that the taller the bridge is, and the less wood it contains (narrow feet, big cutouts), the more resonant it is. The violin will then sound more powerful and bright. Those are good characteristics. If your violin is too bright, perhaps getting to sharpness, you may be able to warm and darken the tone by deadening it, effectively, with a heavier bridge.


 My first bridge carving ended up less than perfect, but a huge improvement. I strung it up before carving it thinner and opening up the holes, and the sound before and after was incomparable. Not to mention that it looks beautiful.

Fitting the bridge -- i.e. shaping the feet -- will be another post. I didn't take any pictures of that process with this first bridge, but soon I will be replacing it and I will document the method I use then (graphite and an exacto knife, not sandpaper).